Kubernetes has become the go-to standard for container orchestration. Its powerful features and flexibility make it a game-changer for cloud-native applications. But, as more and more organizations start using Kubernetes, it becomes apparent that safety must come first.
To help you make good use of Kubernetes without comprising security, we’ve put together the Kubernetes Security Checklist for 2025. With straightforward tips and actionable insights, we aim to make security more approachable and effective for everyone. Let’s get started.
What is Kubernetes?
Kubernetes, often just called K8s, is an open-source platform designed to automate the deployment, scaling, and management of containerized applications. It provides a comprehensive framework for managing microservices architectures, enabling organizations to deploy applications seamlessly across various environments.
But here’s the catch: with great power comes great responsibility. While more companies jump on the Kubernetes bandwagon, the potential risks start piling up. Think about it—if a hacker gets into your Kubernetes cluster, they could exploit potential vulnerabilities, steal data, or even take down your whole operation.
That’s why Kubernetes security is such a big deal in 2025 The threats out there are getting sneakier, and you can’t afford to leave your digital doors wide open. Prioritizing security means not only protecting your data but also keeping your customers’ trust and your reputation intact.
With this understanding of Kubernetes and its security, let’s explore a comprehensive Kubernetes security checklist to help safeguard your Kubernetes deployments.
| Read More About Kubernetes!Curious to know more about Kubernetes? Read our comprehensive guide on Kubernetes here! |
Building a Secure Kubernetes Ecosystem: A Kubernetes Security Checklist for 2025
1. Authentication & Authorization:
When it comes to Kubernetes, achieving the level of controlled access is crucial. This is where Authentication and Authorization (Authn & Authz) come in, acting as the gatekeepers of your cluster.
Authentication: Who Are You?
Authentication is the first step, verifying the identity of users and services trying to access the Kubernetes API server. Think of it as the guard at the castle gate, checking the identification of everyone who approaches. Here’s how to strengthen your authentication game:
- Role-Based Access Control (RBAC): RBAC is your friend. It allows you to define roles (like “admin” or “developer”) and assign least privilege permissions to users and services based on their roles. Just like assigning specific duties within the castle (stables vs. armory), RBAC ensures no one has more access than they need.
- Strong Authentication Methods: Don’t settle for a simple password – it’s like having a weak entrance. Consider using multi-factor authentication (MFA) which adds an extra layer of security, requiring a second verification factor like a code from your phone. This makes unauthorized access much more difficult.
Authorization: What Can You Do?
Once a user or service is authenticated, authorization determines what actions they are allowed to perform. It checks if someone has permission to access a specific resource. Here’s how to solidify your authorization strategy:
- Fine-Grained Permissions: With RBAC, you can define granular permissions for resources like deployments or pods. This allows you to control exactly what users can do, ensuring they can only create, modify, or view resources they’re authorized for.
- Least Privilege Principle: Remember, with great power comes great responsibility! Always follow the principle of least privilege. Grant users and services the minimum permissions necessary to complete their tasks.
| Did You Know? 90% of organizations faced a Kubernetes or container security incident within the past year. Don’t wait for a breach to take action—prioritize security now to protect your assets and maintain your reputation! |
2. Prohibit Public Access
One of the most critical security measures you need to have in place for your Kubernetes environment is restricting public access. By default, Kubernetes exposes various API endpoints and services that, if left unprotected, could potentially allow unauthorized access to your cluster and the applications running on it.
It’s absolutely essential that you take steps to prohibit direct public access to your Kubernetes infrastructure. This includes:
- Ensuring the Kubernetes API server is only accessible from within your internal network or via a secure VPN connection. Avoid exposing the API server directly to the internet.
- Configuring your load balancers and ingress controllers to only accept traffic from trusted sources. Avoid exposing NodePort services directly to the public internet.
- Implementing network policies to restrict inbound and outbound traffic to and from your Kubernetes pods and services. Only allow the necessary traffic flows based on your application requirements.
- Leveraging features like Network Policy and Calico to enforce granular network access controls and segment your Kubernetes environment.
- Regularly reviewing your network configurations and firewall rules to ensure no unintended public access paths exist.
3. Network Security
While access control is crucial, securing communication within your cluster is equally important. Network security in Kubernetes revolves around creating isolated and controlled environments for your pods. Here are some key strategies:
- Network Policies: These Kubernetes resources, as mentioned earlier, are like security guards patrolling the castle walls. They define rules for pod-to-pod communication and ingress/egress traffic to the cluster. By implementing network policies, you can restrict pods from talking to unauthorized services or exposing sensitive data unnecessarily.
- Service Mesh: Imagine a network of interconnected watchtowers. A service mesh provides an additional layer of network security for microservices communication within your cluster. It allows for features like:
- Traffic encryption: Encrypting communication between pods ensures data confidentiality even if intercepted within the cluster network.
- Traffic management: The service mesh can control how traffic is routed, allowing for features like load balancing and fault tolerance.
- Monitoring: Gain valuable insights into service-to-service communication, aiding in troubleshooting and identifying potential security issues.
- Pod Security Policies (PSPs): Think of these as security protocols for your castle’s inhabitants (pods). PSPs define baseline security configurations for pods, such as:
- Disallowing privileged containers
- Restricting file system access
- Defining mandatory security contexts
These measures, combined, create a secure network environment within your Kubernetes cluster. Network policies and service mesh enforce communication control, while PSPs ensure individual pods adhere to security best practices.
| Read more: Check out our Top 10 Kubernetes Security Best Practices to keep your environment secure—explore now! |
4. Pod Security
Pod security is all about enforcing a principle of least privilege and creating a secure execution environment for your applications.
- Least Privilege: Enforce the principle of least privilege by running pods with non-root user accounts. This minimizes potential damage if a vulnerability is exploited.
- Restrict Capabilities: Pods often don’t require full system capabilities. Utilize Pod Security Policies (PSPs) to restrict unnecessary capabilities like SYS_CAP or NET_ADMIN, further hardening the pod’s security posture.
- Read-Only Filesystems: Consider mounting volumes in read-only mode whenever possible. This prevents accidental data modification and reduces the attack surface for potential filesystem exploits.
- Secrets Management: Store sensitive information like passwords and API keys securely using Kubernetes Secrets. Avoid embedding them directly in pod configurations. Secrets management tools like Vault or AWS Secrets Manager provide secure storage and access control mechanisms.
- Security Context: Utilize the Pod Security Context to define security settings for individual containers within a pod. This allows you to fine-tune security based on the specific needs of each container.
5. Logging and Auditing
In Kubernetes, security, logs and auditing are absolutely essential. Think of them as the eyes and ears of your entire environment – they’re the only way you’re going to be able to truly understand what’s happening under the hood and quickly detect any suspicious activity.
Logging and auditing can seem like a bit of a headache, but trust me, it’s a headache you really can’t afford to ignore. Especially in 2025, when the threat landscape is only getting more complex and sophisticated.
So, what should you be focusing on when it comes to logs and auditing in your Kubernetes setup? A few key things come to mind:
Enable Comprehensive Logging. Make sure you’ve got robust logging enabled across your entire Kubernetes stack – from the API server and controllers to your individual workloads and services. Capture as much relevant information as you can, because you never know when that data might come in handy.
Implement Centralized Log Management. Don’t just let those logs languish on individual nodes. Instead, implement a centralized log management solution that can aggregate, analyze, and alert on important events from across your entire Kubernetes environment.
Configure Audit Logging. Kubernetes’ built-in audit logging functionality is an absolute must-have. This allows you to track and record all the activities and requests happening against your API server – a critical security monitoring capability.
Integrate with SIEM/SOC Tools. Take your log management and analysis to the next level by integrating your Kubernetes logs with your organization’s broader security information and event management (SIEM) or security operations center (SOC) tooling.
Regularly Review and Audit. Logging and auditing isn’t a “set it and forget it” kind of deal. You need to be constantly reviewing your logs, analyzing trends, and auditing your configurations to ensure nothing slips through the cracks.
6. Pod Placement: Controlling Where Your Workloads Run
When it comes to securing your Kubernetes environment, one critical area you can’t afford to overlook is pod placement. After all, where you decide to schedule your workloads can have a huge impact on your overall security posture.
Think about it – if you’re just randomly throwing pods onto random worker nodes, you’re essentially leaving the door wide open for potential cross-contamination and lateral movement. But if you take the time to thoughtfully manage pod placement, you can create powerful security barriers and isolate your mission-critical applications.
So, what are some of the key pod placement strategies you should be leveraging in 2025?
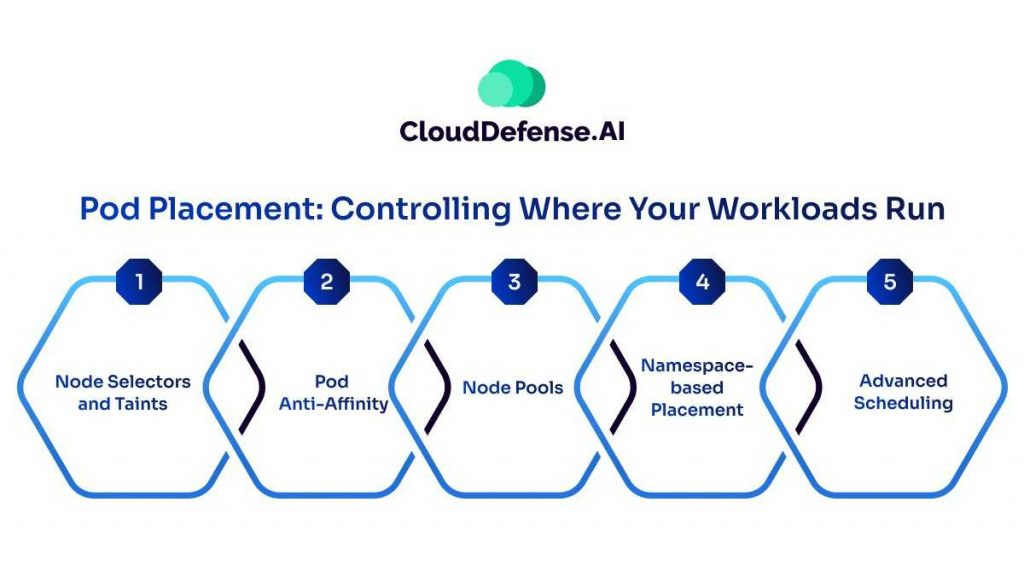
Node Selectors and Taints Use Kubernetes node selectors and taints to ensure your pods only land on the appropriate worker nodes. This allows you to create logical boundaries and prevent sensitive workloads from running on nodes that may be less secure or have a higher risk profile.
Pod Anti-Affinity Leverage pod anti-affinity rules to ensure that related pods (like those belonging to the same application) are scheduled onto different nodes. This helps minimize the blast radius in case one of your pods gets compromised.
Node Pools Establish dedicated node pools for specific types of workloads, like high-risk or regulated applications. This gives you granular control over resource allocation and security requirements for those environments.
Namespace-based Placement Take advantage of Kubernetes namespaces to logically partition your cluster and apply tailored pod placement policies. This allows you to create security zones and maintain separation of concerns.
Advanced Scheduling Explore more sophisticated pod placement strategies, like using the Kubernetes Scheduler Framework to implement custom scheduling algorithms or integrating with external placement engines like Fairwinds Pluto.
Secure pod placement isn’t just about where your workloads run – it’s about proactively creating barriers, isolating risk, and minimizing the potential impact of any security incidents. Take the time to get this right, and you’ll be well on your way to a more resilient Kubernetes environment.
7. Secret Management
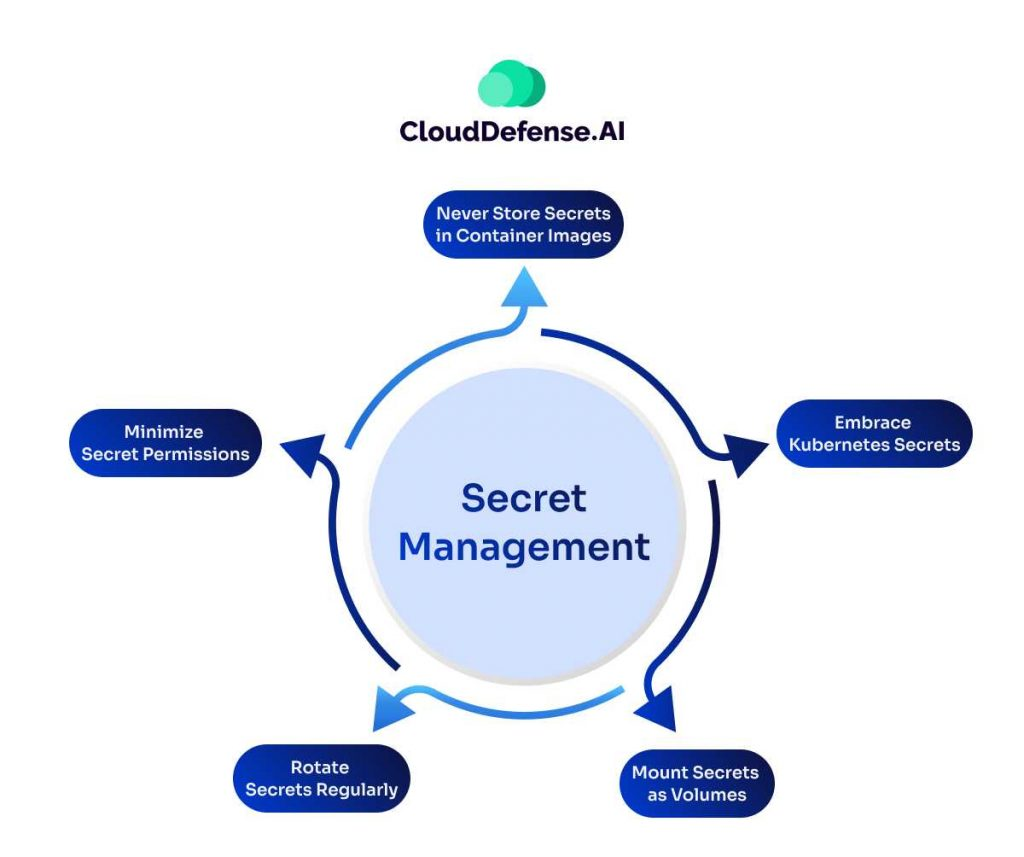
When you’re running mission-critical applications on Kubernetes, your secrets – the API keys, database passwords, SSL/TLS certificates, and other sensitive data that keep your workloads humming – are quite literally the keys to the kingdom. If those fall into the wrong hands, you’re looking at a potentially disastrous data breach or service disruption.
That’s why getting your secrets management dialed in has to be a top priority for any Kubernetes security strategy. Fortunately, the platform provides some robust built-in capabilities to help you keep your secrets secure. But you’ve got to know how to leverage them effectively.
Never Store Secrets in Container Images. Treat secrets like the crown jewels they are. Embedding them directly within container images is a security nightmare. Even private repositories can be breached.
Embrace Kubernetes Secrets. First and foremost, make sure you’re actually using the Kubernetes Secrets resource to store and distribute your sensitive data, rather than embedding it directly in your pod specs or container images. This gives you a centralized, API-driven way to manage your secrets, with fine-grained access controls.
Mount Secrets as Volumes. Grant pods access to secrets only when necessary. Mount Secrets as volumes within pods that require them. This approach minimizes the attack surface and ensures secrets aren’t inadvertently exposed in logs or other locations.
Rotate Secrets Regularly. Just like changing your passwords, secrets should be rotated periodically. This reduces the window of opportunity for attackers who might gain unauthorized access. Consider leveraging automation tools to streamline secret rotation.
Minimize Secret Permissions. The principle of least privilege applies to secrets as well. Grant access to secrets only to the pods that absolutely need them. This minimizes the blast radius of a potential compromise.
8. Images Optimization
Secure images are the bedrock of a secure Kubernetes cluster. Here’s how to optimize your images:
- Minimalism is Key: Strip down your images to the essentials – the application and its dependencies. Leave shells, debuggers, and unnecessary packages out. Ephemeral debug containers can be used for troubleshooting if needed.
- Unprivileged by Default: Configure images to run with an unprivileged user by default using the USER instruction in your Dockerfile. This reduces the potential damage within the container.
- SHA-256 Digests for Certainty: Reference images by their unique SHA-256 digests instead of tags. Tags can change, but digests ensure you’re deploying the intended image version. Alternatively, use admission control to verify image signatures at deployment.
- Scan. Patch. Repeat: Regularly scan images during creation and deployment to identify and patch vulnerabilities. Integrate image scanning into your CI/CD pipeline to ensure only secure images reach production.
By following these practices, you build lean, secure images that minimize attack vectors and solidify the security foundation of your Kubernetes cluster.
9. Admission Controllers
Admission controllers bascially play a critical role as the gatekeepers of your cluster. These dynamic webhook-based components allow you to interject and enforce security policies at the point of resource creation or update, ensuring that only compliant and secure configurations make it into your environment.
Kubernetes provides a robust set of built-in admission controllers that you can leverage, each serving a specific purpose. Some key examples include:
- MutatingAdmissionWebhook – Allows modifying objects before they are persisted.
- ValidatingAdmissionWebhook – Validates objects and can reject invalid requests.
- PodSecurityPolicy – Enforces security constraints on pod specifications.
- ImagePolicyWebhook – Validates the provenance and integrity of container images.
On carefully configuring and chaining together these admission controllers, you can create a multi-layered security net that scrutinizes every resource being introduced into your Kubernetes cluster.
The key is understanding how to configure these admission controllers effectively. You’ll need to define the appropriate rules and policies, ensure high availability and resilience, and carefully monitor for any failures or bypasses. Getting this right requires a deep understanding of Kubernetes internals and security principles.
10. Cluster Configuration Security
In the grand scheme of Kubernetes security, a well-configured cluster acts as the bedrock upon which all other security measures rest. Here’s how to ensure your cluster is built on a solid security foundation:
API Server Security: The Kubernetes API server is the central nervous system of your cluster. Securing it is paramount.
- Enable Authentication: Enforce authentication using methods like client certificates or tokens to verify user identity before granting access.
- Restrict Access: Implement authorization using Role-Based Access Control (RBAC) to define who can perform what actions on the API server. Grant least privilege to users and service accounts.
RBAC for All: RBAC is not just for the API server. Enforce RBAC at the namespace level as well. This allows you to define granular permissions for users and service accounts within specific namespaces, further restricting access to resources.
Network Segmentation: Don’t let your cluster become a wide-open field. Utilize Network Policies to create isolated network segments within your cluster. This restricts communication between pods and limits the blast radius of a potential security breach.
Node Security: The worker nodes where your pods run are critical components. Secure them by:
- Minimizing Privileges: Run the kubelet with minimal permissions, reducing the potential impact of vulnerabilities.
- Restrict Container Runtime: Limit the container runtime (like Docker) to only authorized actions to prevent unauthorized container execution.
- Security Profiles for Nodes: Utilize tools like kube-node-lease or CIS Kubernetes Benchmark to configure secure defaults for your nodes.
Least Privilege Everywhere: The principle of least privilege should be your mantra. Apply it to everything – user permissions, container capabilities, network access – ensuring minimal access rights for all entities within the cluster.
11. Secure OS configuration
Harden your Kubernetes castle’s defenses by securing the underlying operating system on your cluster nodes. Here’s your security checklist:
- Choose a Secure OS: Opt for an immutable Linux distribution specifically designed for containers, like Flatcar Container Linux or Bottlerocket. These offer security advantages with features like read-only root filesystems and minimal attack surfaces.
- Keep it Updated: Patch your nodes religiously. Regularly update the OS kernel and container runtime to address known vulnerabilities and prevent attackers from exploiting them.
- Minimize Privileges: Run the kubelet service with the least privileges necessary to function. This reduces the potential damage if a vulnerability within the kubelet is exploited.
- Restrict Container Runtime: Configure your container runtime (like Docker) to only allow authorized actions. This prevents unauthorized container execution and enhances overall security.
Final Words
Securing your Kubernetes cluster is an ongoing journey, but by following the best practices outlined in this Kubernetes Security Checklist, you’ve taken a significant step towards building a resilient defense. Remember, security is a shared responsibility. Constantly monitor your cluster for suspicious activity, stay updated on evolving threats, and leverage security tools to automate tasks and streamline your security posture.
Simplify and Automate Your Kubernetes Security with CloudDefense.ai
Managing Kubernetes security can be complex and time-consuming. CloudDefense.ai offers a comprehensive Kubernetes Security Posture Management (KSPM) solution that streamlines the process. Our platform automates critical tasks like:
- Vulnerability scanning for container images
- Enforcing security policies across your cluster
- Monitoring for suspicious activity and potential breaches
Book a Free Demo Today!
Experience firsthand how CloudDefense.AI can help you build a stronger security posture for your Kubernetes deployments. Contact us today to schedule a free demo and see how we can empower you to confidently navigate the ever-changing security landscape.